
Using elab2ARC
This guide explains how to convert eLabFTW experiments and resources into an ARC with elab2ARC. For an overview of the tool, see About elab2ARC. If your eLabFTW or DataHUB instance is self-hosted, first follow the setup for self-hosted instances.
Setting up Tokens for elab2ARC
Section titled “Setting up Tokens for elab2ARC”Create a Personal Access Token in DataHUB
Section titled “Create a Personal Access Token in DataHUB”-
Sign in to the DataHUB
-
Navigate to your user settings
-
Open the
Access Tokenssettings in the sidebar(1) -
Enter or adapt the required token information
(2)(more about token information here) -
Click
Create personal access token (3)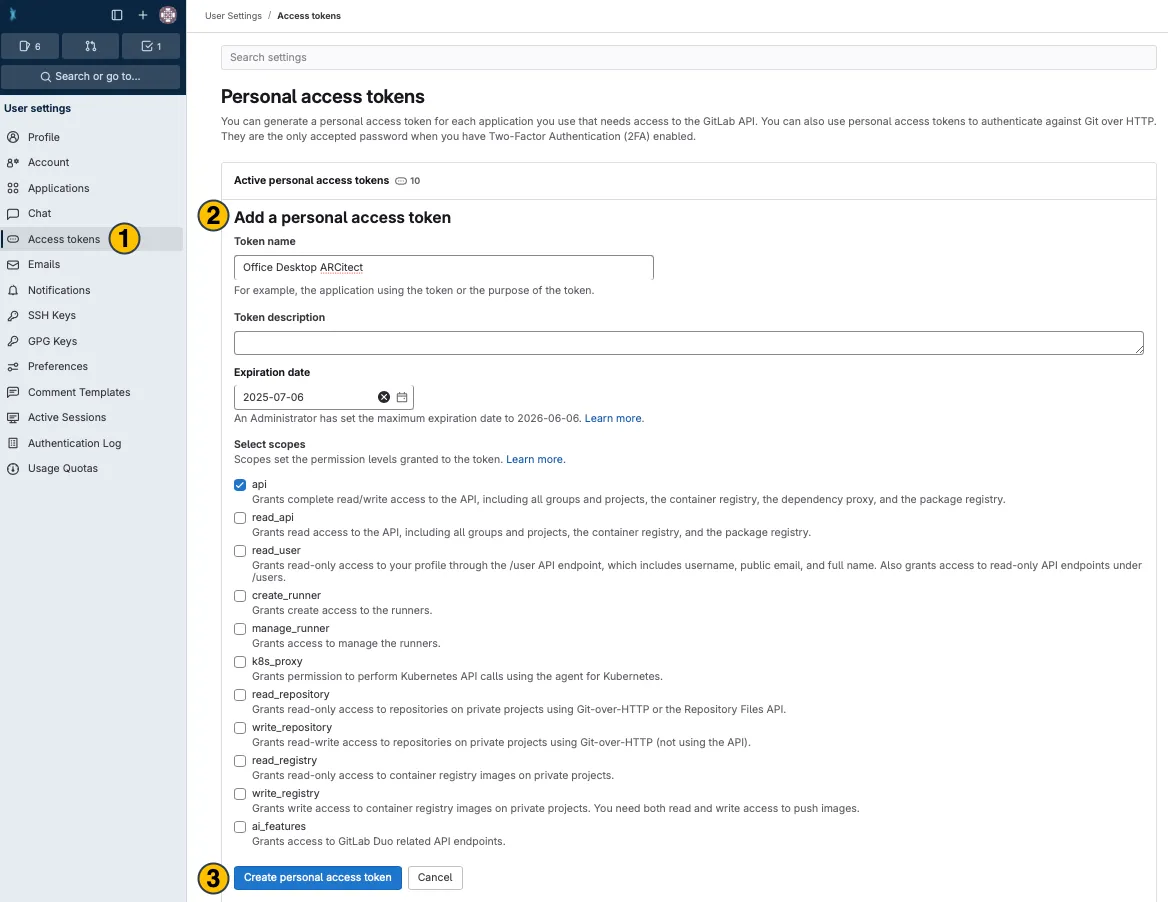
-
Your new personal access tokenappears on top. Copy(4)and use it in the desired application.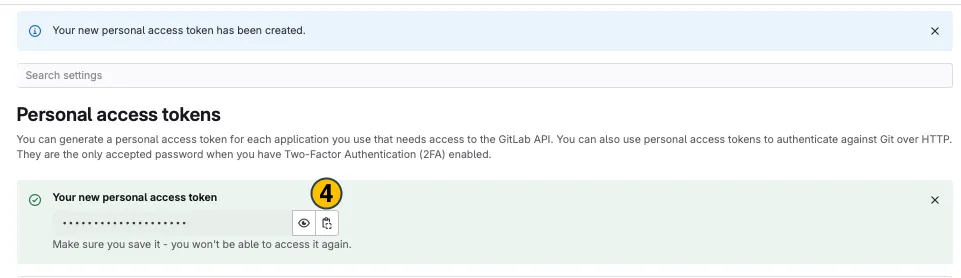
Create an eLabFTW API key
Section titled “Create an eLabFTW API key”- Login to your eLabFTW instance
- Navigate to
User Settings
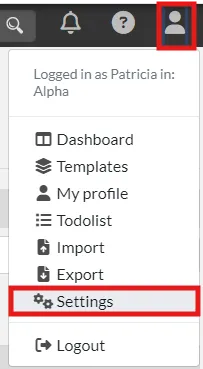
- Navigate to
API KEYSTab. Enter a name and a Read Only permissions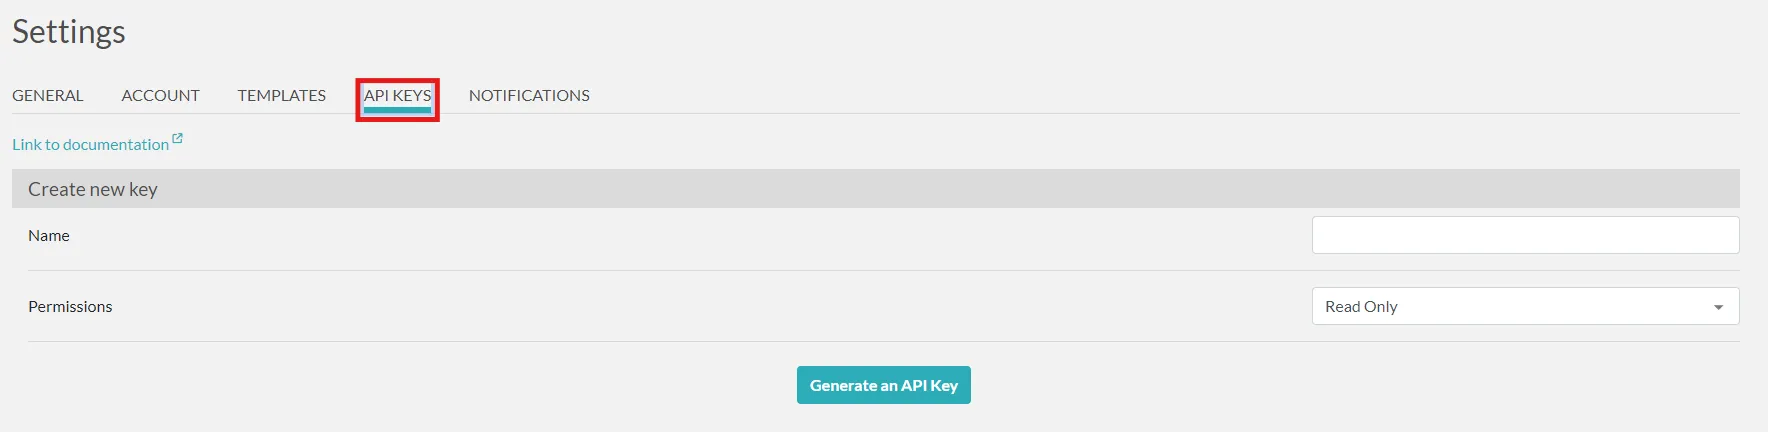
- Save the key securely, as it will only be displayed once. Treat it like a password, as it grants access to eLabFTW.

How to use elab2ARC
Section titled “How to use elab2ARC”Open the tool: elab2ARC.
1. Configure instance and tokens
Section titled “1. Configure instance and tokens”In the Tokens tab:
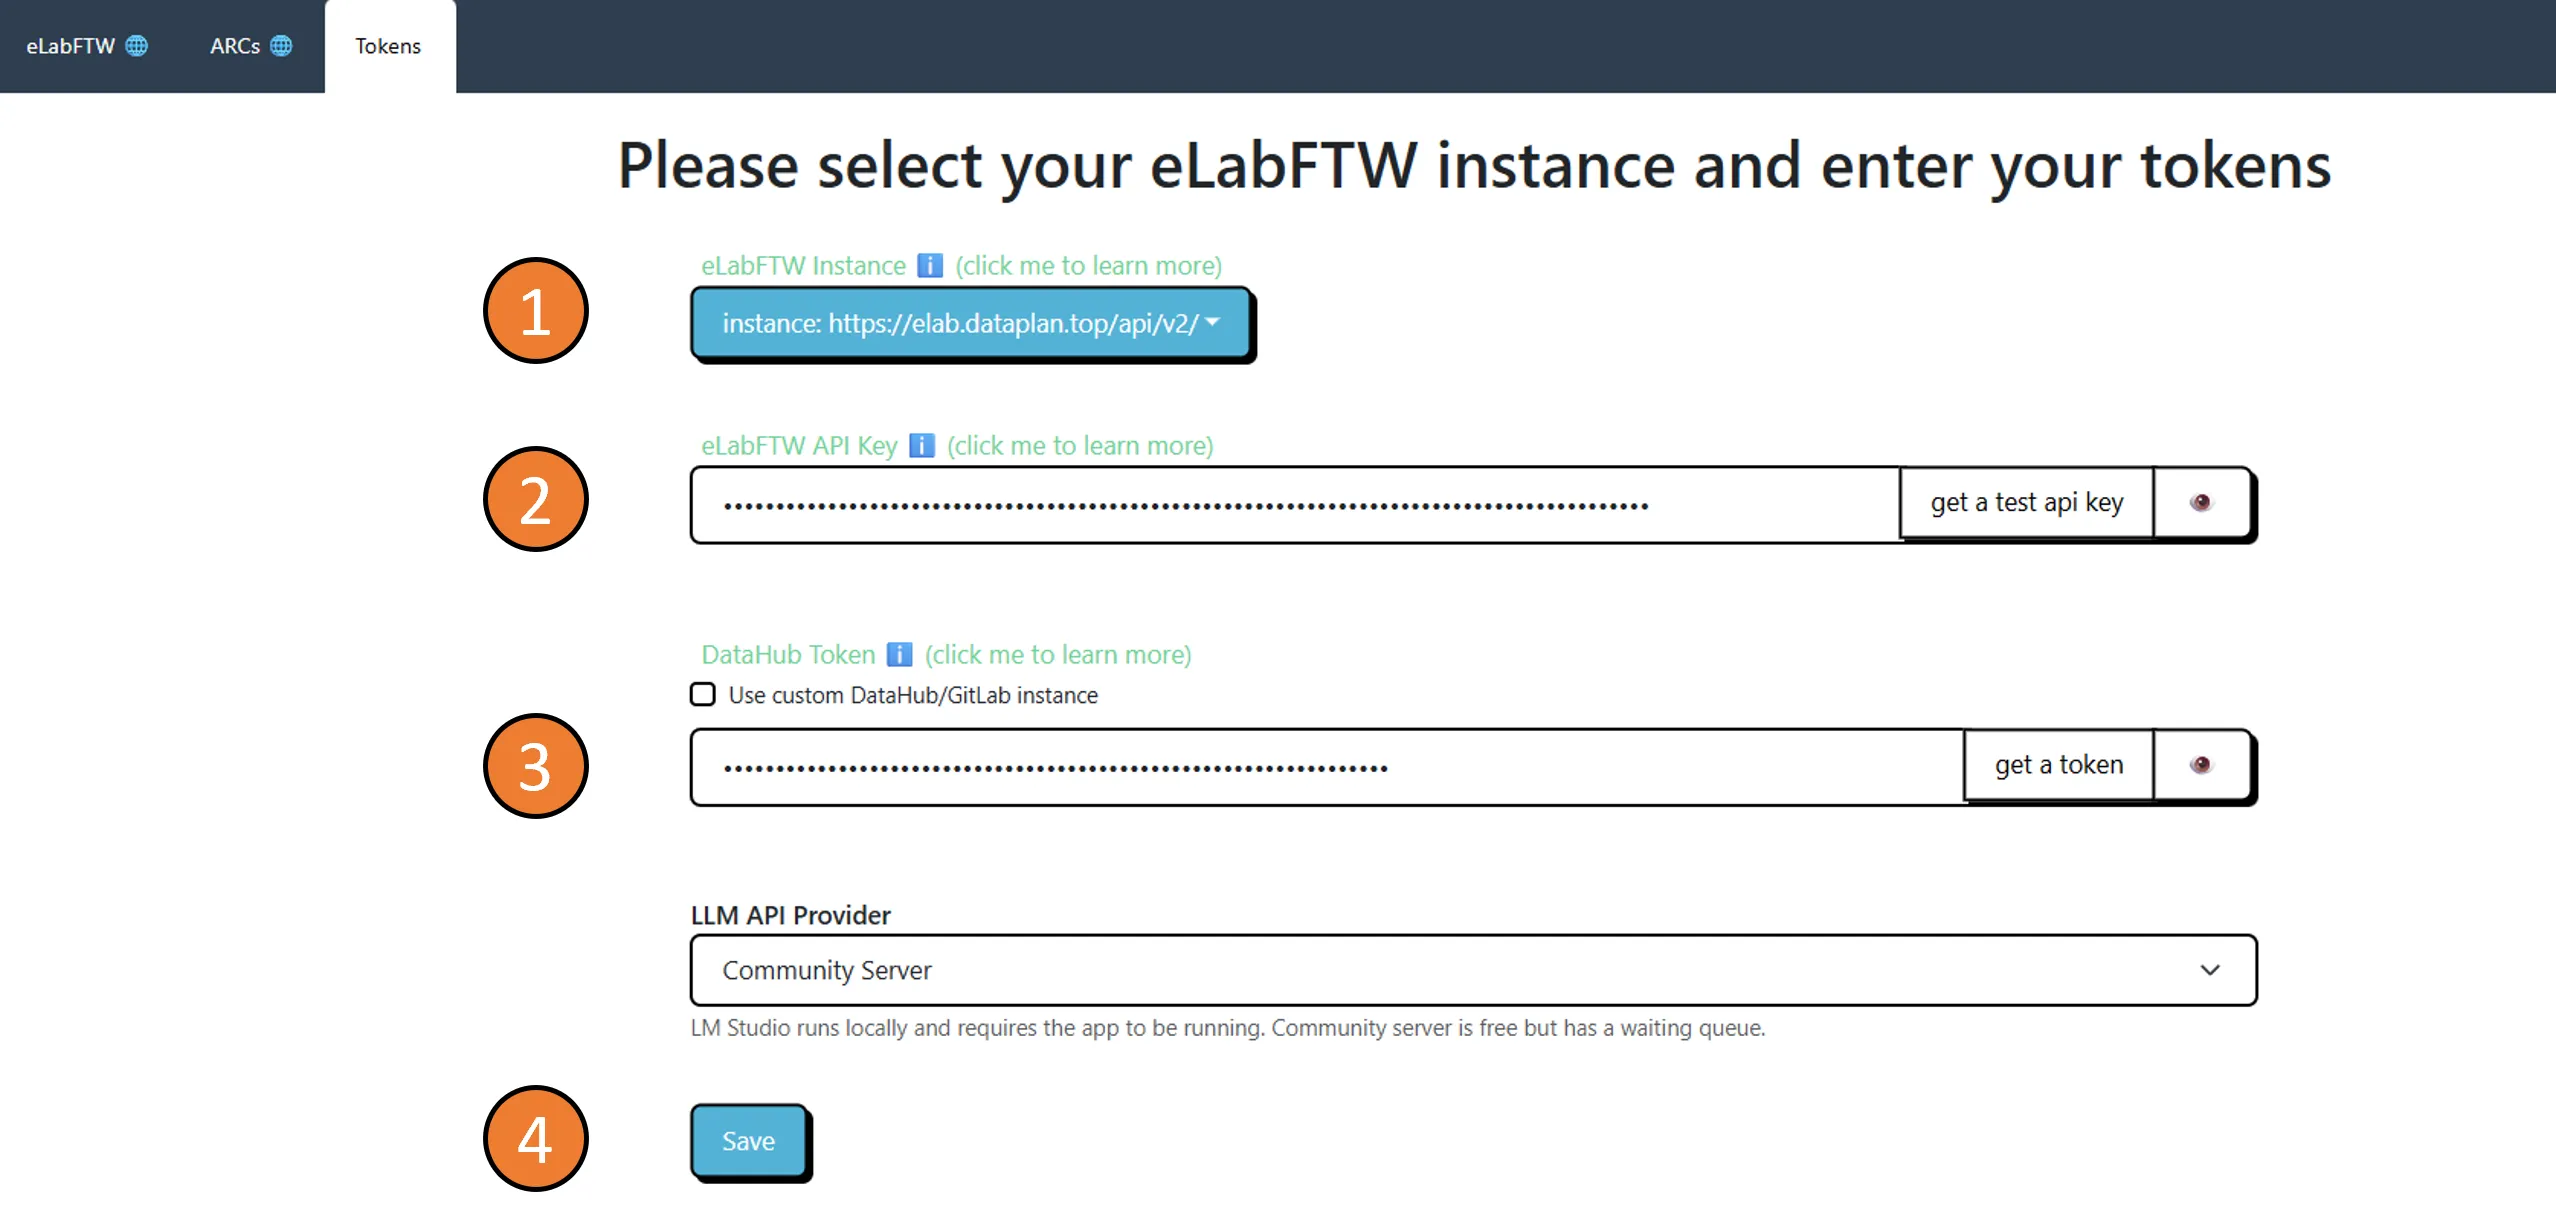
- Select your eLabFTW instance from the drop-down list or add your own [1].
- Paste your eLabFTW API key [2]. For the demo instance, get a test api key fills in a key automatically.
- Paste your DataHUB token or click get a token [3]. To use another GitLab server or GitHub, tick Use custom DataHub/GitLab instance.
- (Optional) Choose an LLM API Provider (see LLM-assisted annotation).
- Click Save [4].
2. Select eLabFTW experiments and resources
Section titled “2. Select eLabFTW experiments and resources”In the eLabFTW tab, all experiments and resources you have access to are listed. Use the search field to filter.
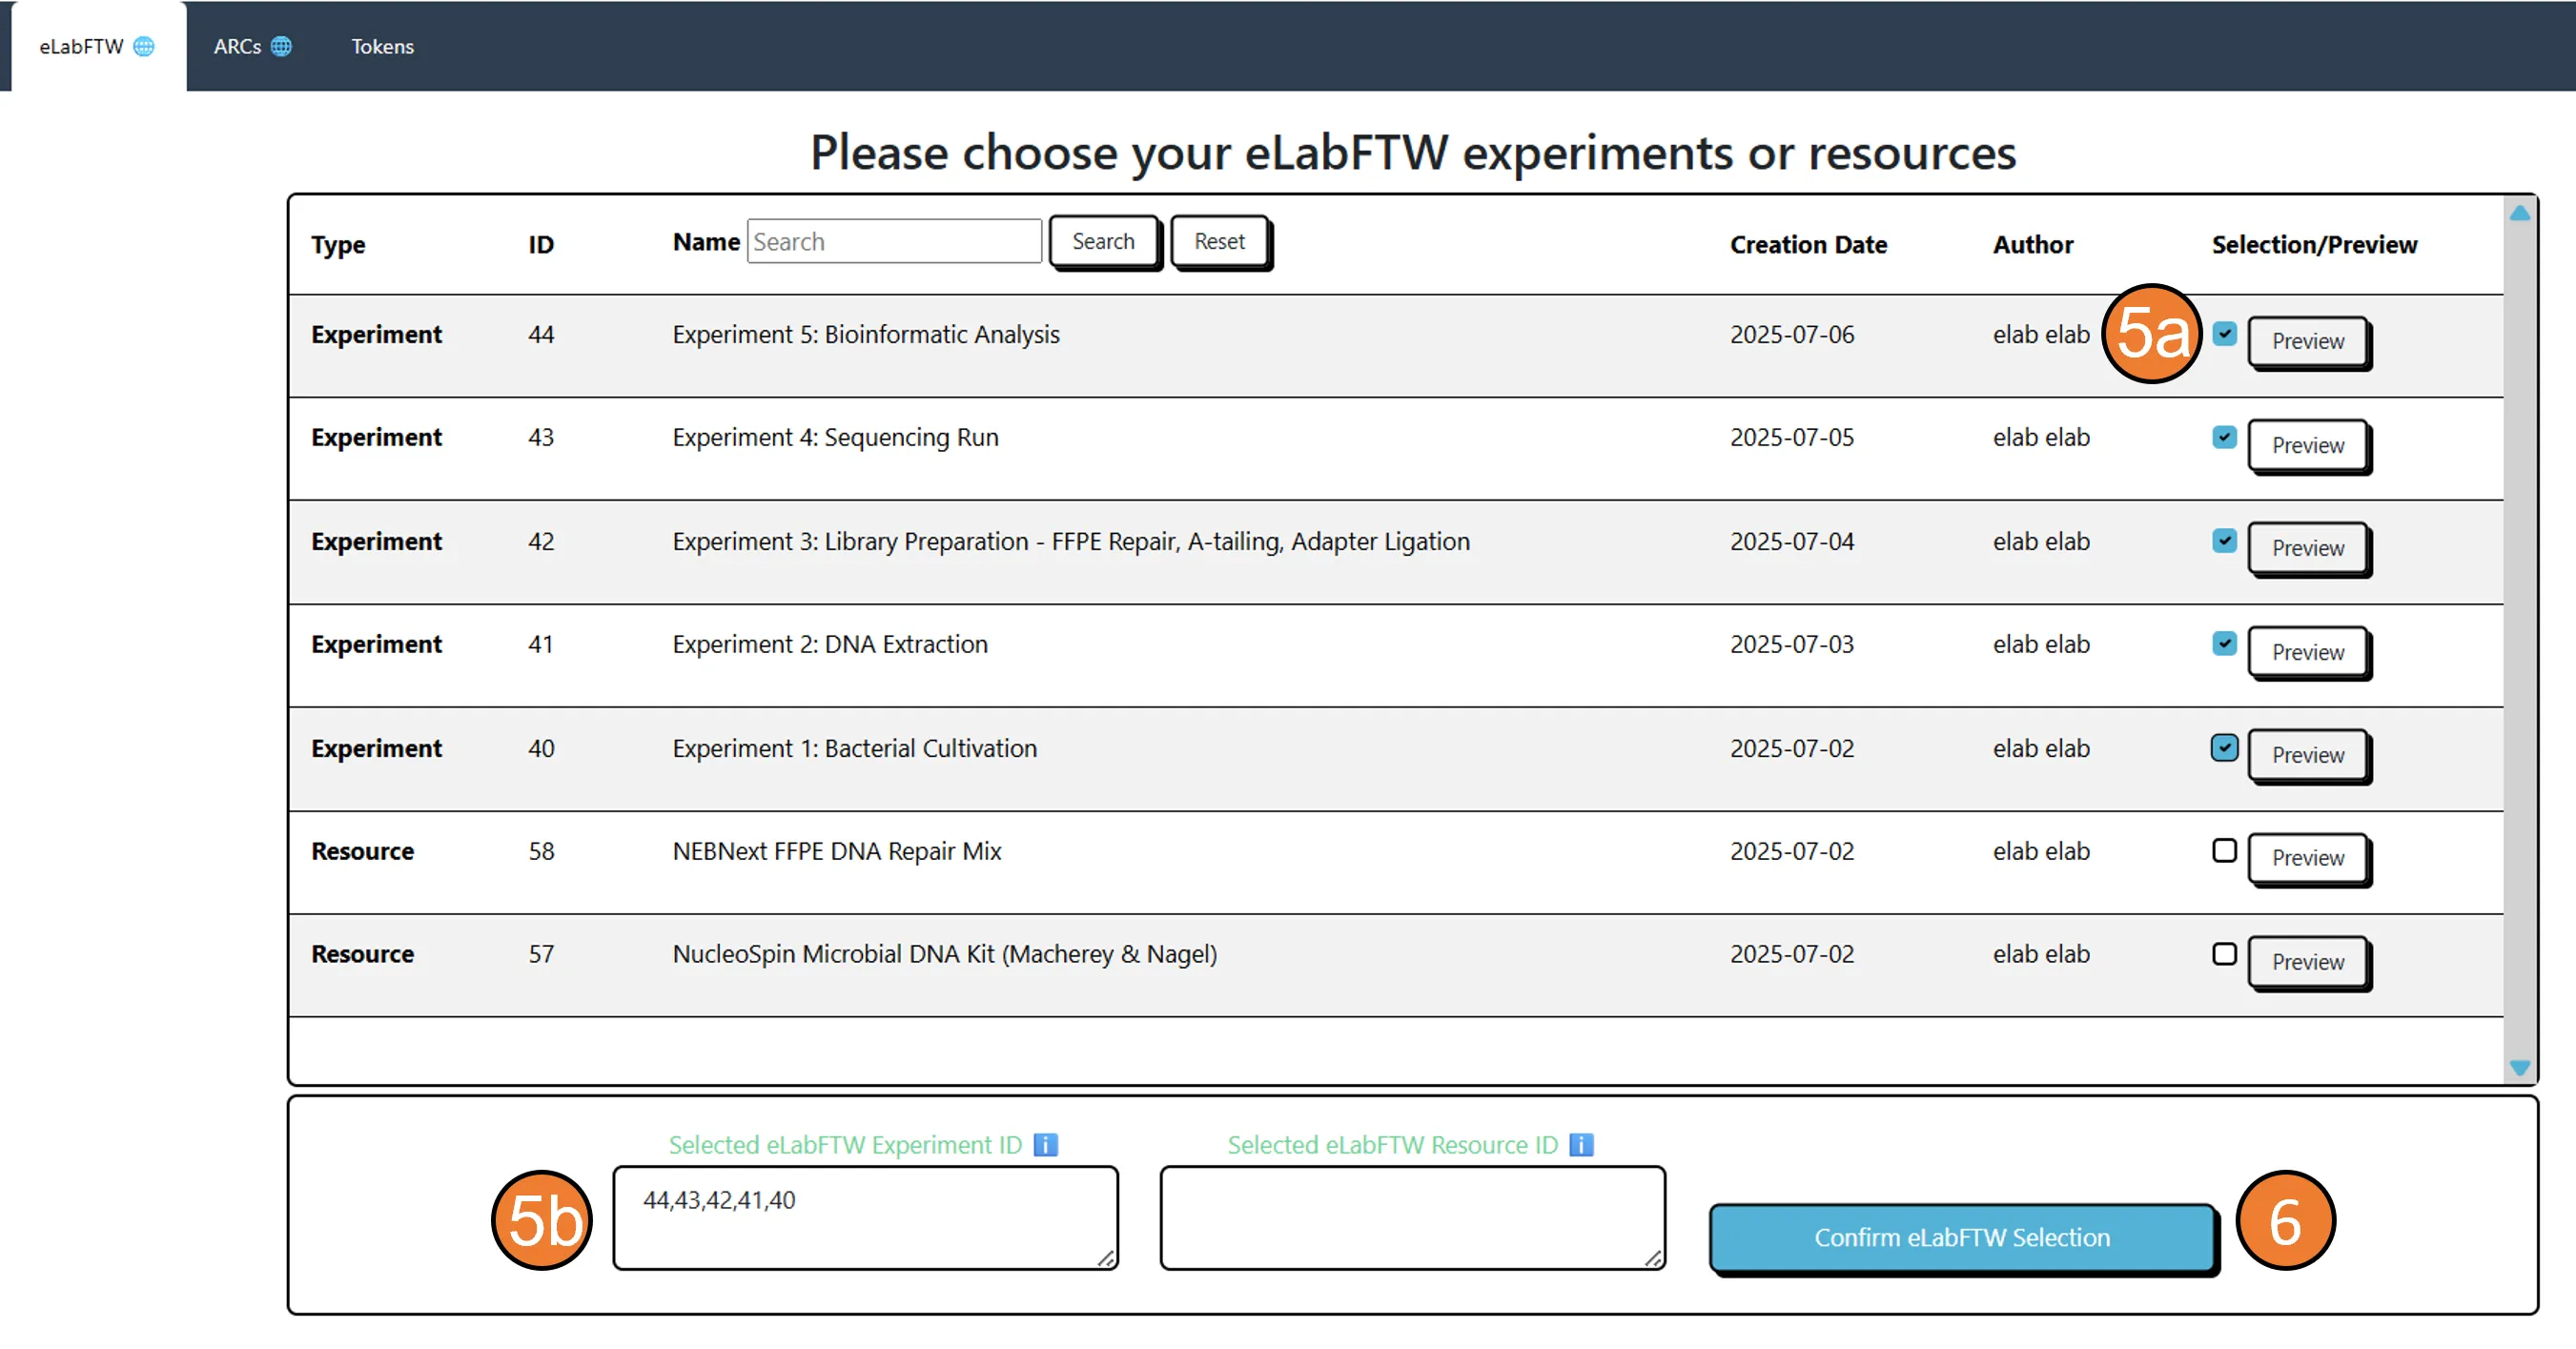
- Click Preview to check an entry (main text, metadata, linked entries, attachments) before converting it.
- Tick the entries you want to convert [5a]. Their IDs are added to the selection fields [5b]; you can also enter IDs there directly, separated by commas.
- Click Confirm eLabFTW Selection [6].
3. Select the target ARC and start the conversion
Section titled “3. Select the target ARC and start the conversion”In the ARCs tab:
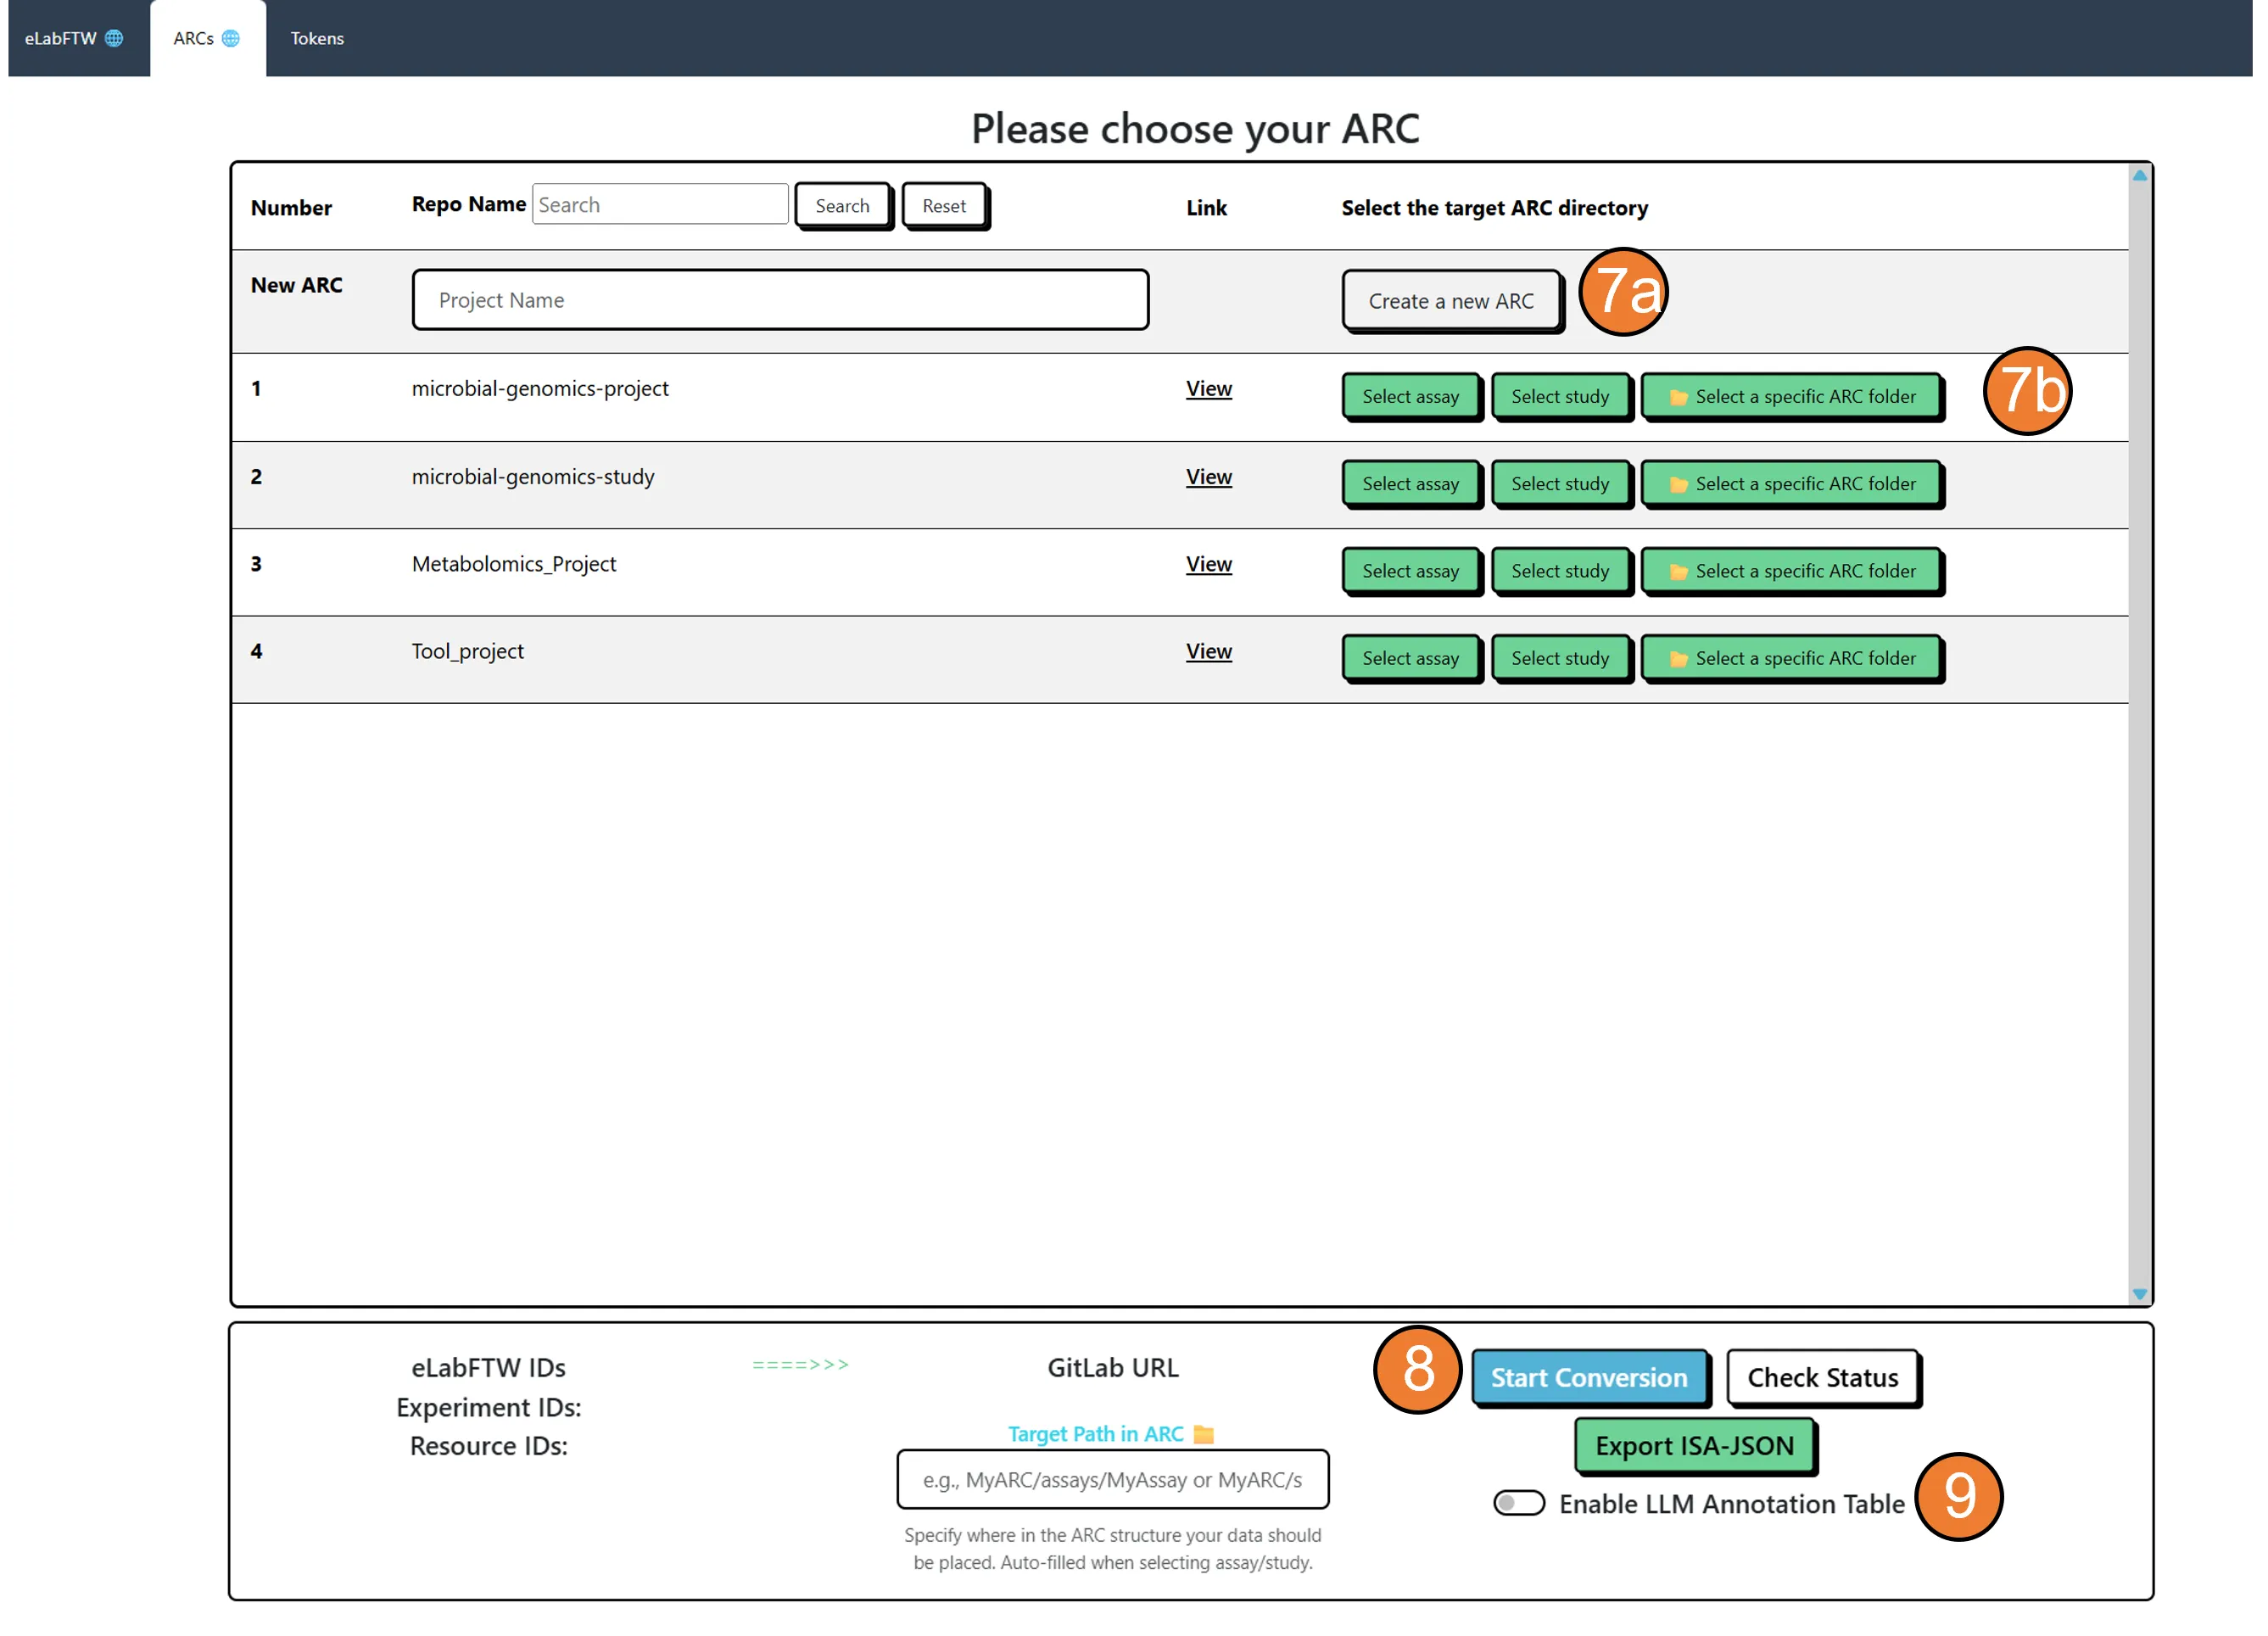
- Either enter a project name and click Create a new ARC [7a], or choose an existing ARC and click Select assay, Select study or Select a specific ARC folder [7b].
- Check the Target Path in ARC (filled in automatically when selecting an assay or study).
- (Optional) Switch on Enable LLM Annotation Table [9]. An Edit Prompt button then appears to adjust the prompt.
- Click Start Conversion [8]. Check Status shows the progress.
- (Optional) Use Export ISA-JSON to download the metadata as ISA-JSON.
Conversion
Section titled “Conversion”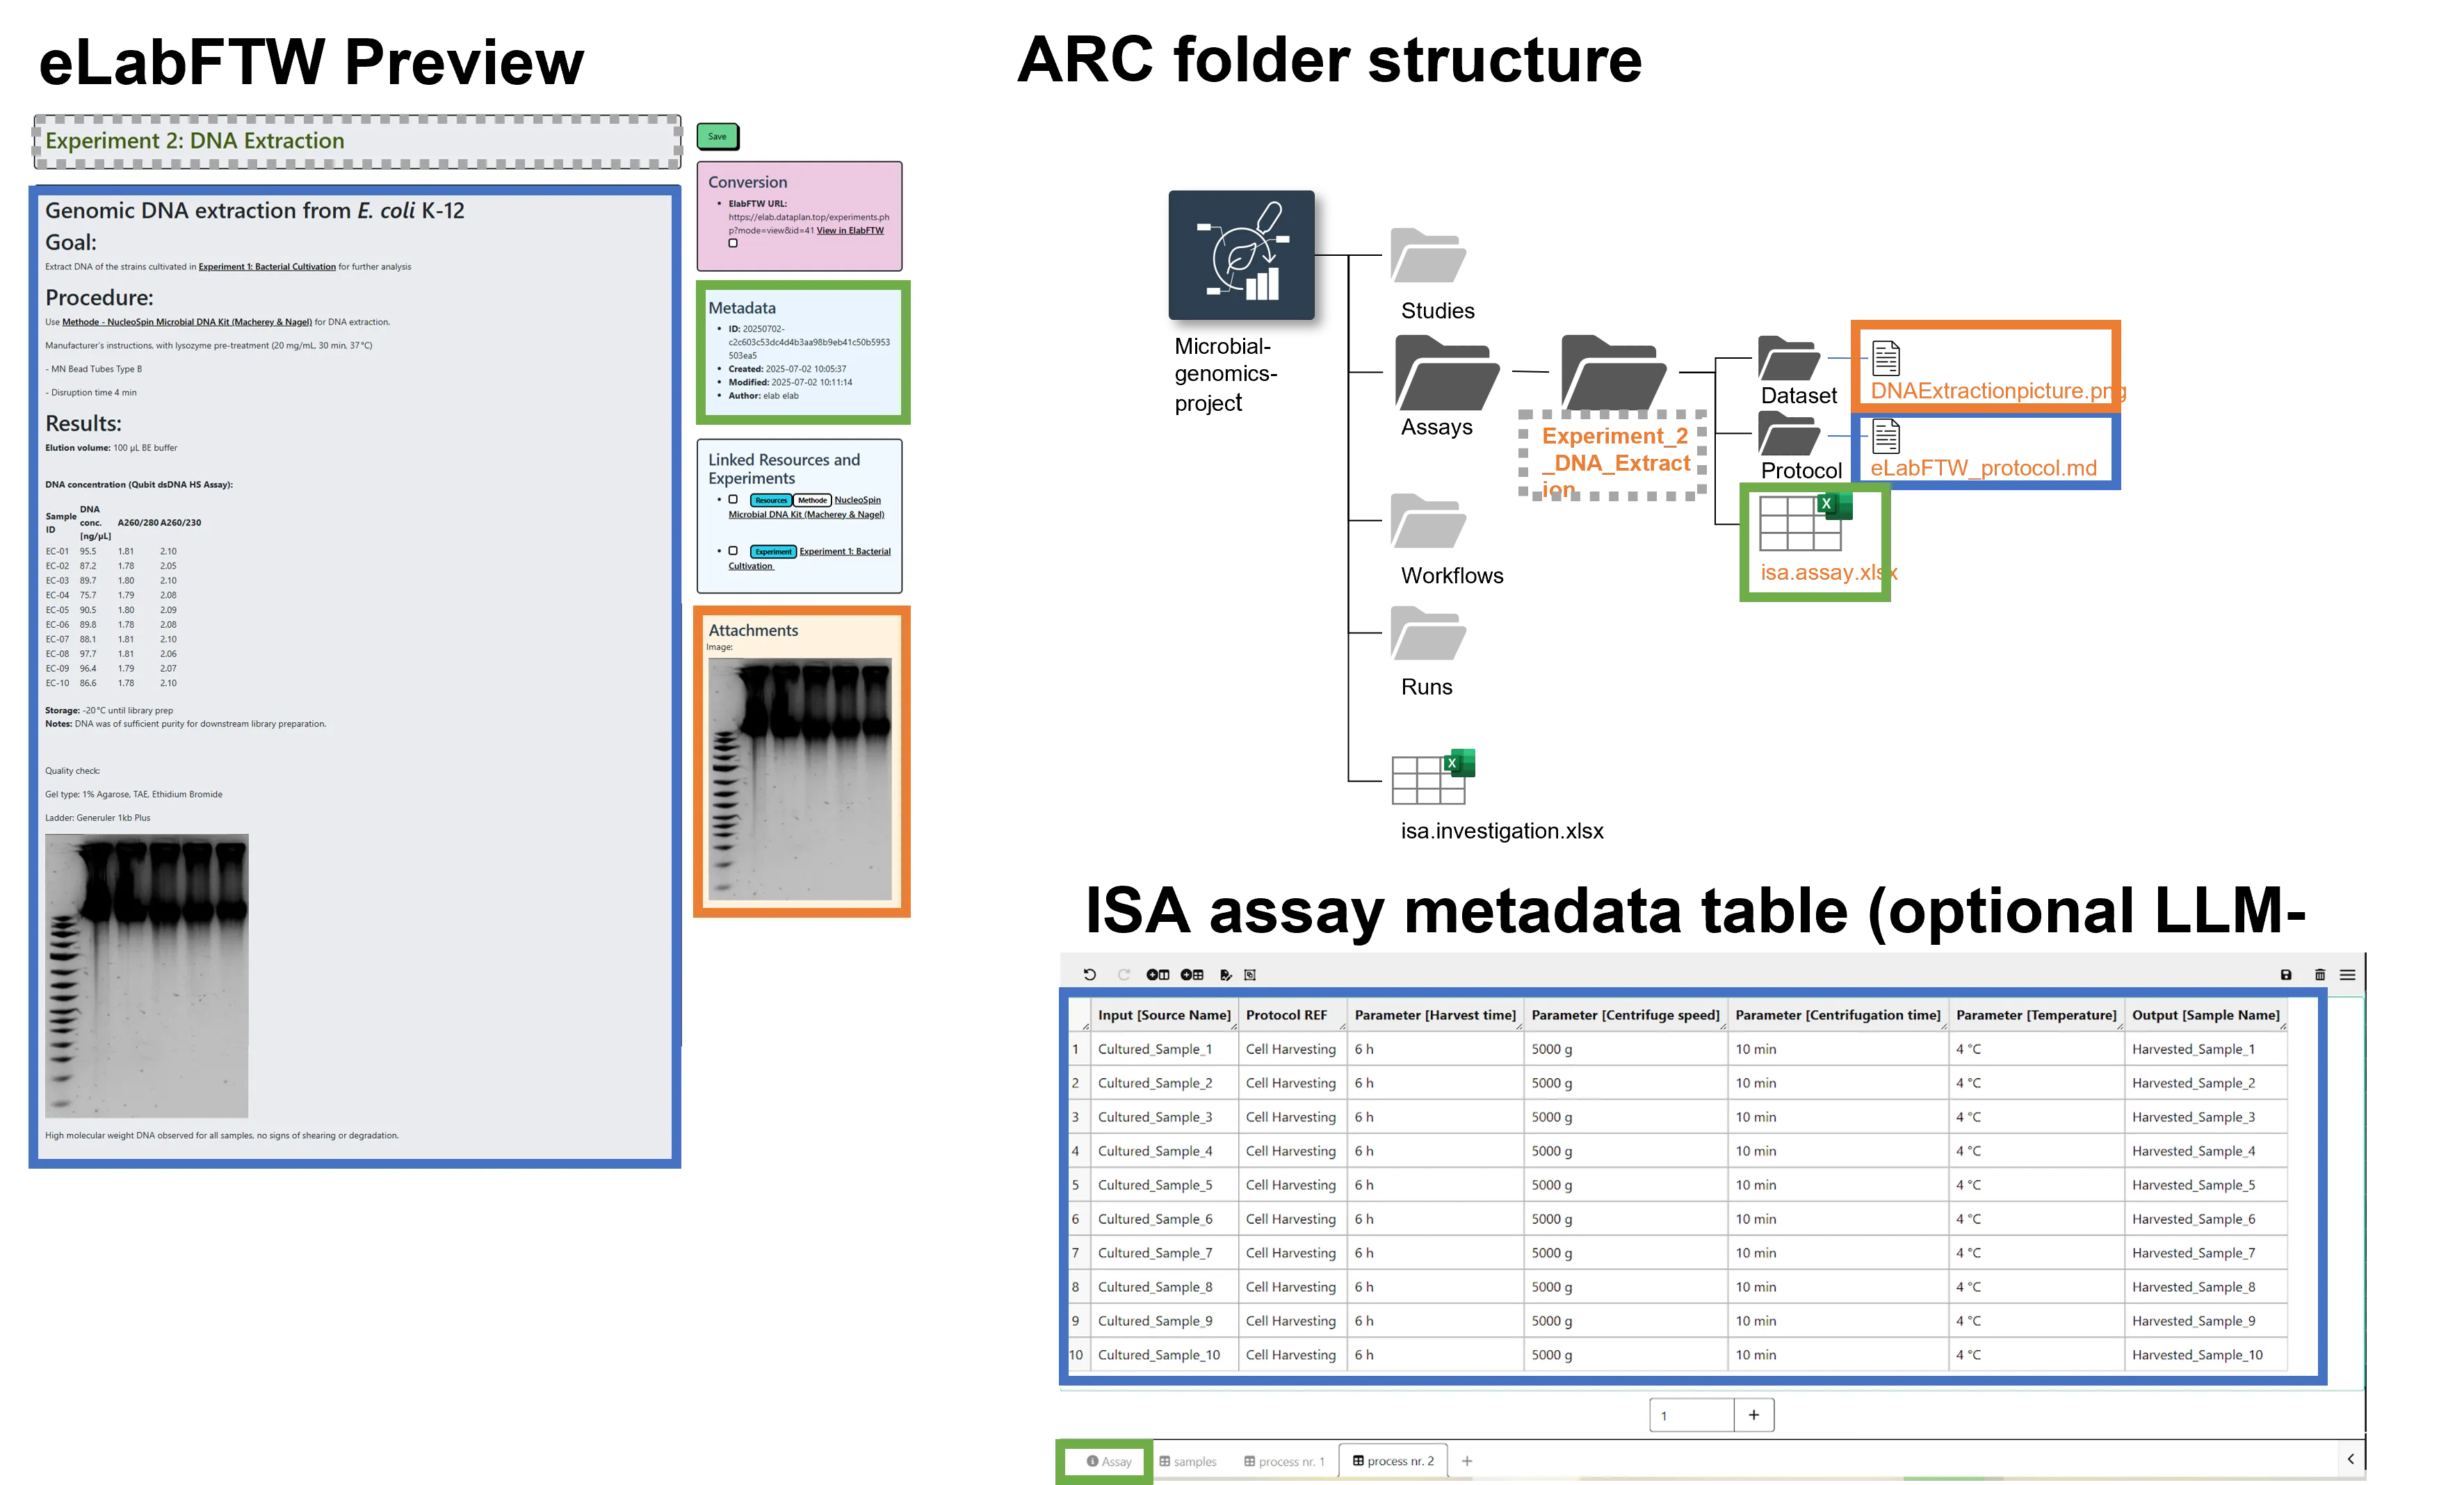
The elab2ARC tool will automatically convert your eLabFTW experiments into ARC format:
- create a new assay folder with the eLabFTW experiment title as assay name (grey, dashed)
- create the assay folder structure (dataset/protocols/isa.assay)
- convert the experiment main text into a Markdown file and store it in the protocols folder (blue)
- add all attachments of the eLabFTW experiment to the dataset folder (orange), handled via Git LFS
- enter the administrative metadata of the eLabFTW entry (e.g. ID, dates, author name/email/affiliation) into the
Assaysheet of the isa.assay file (green) - with the LLM option: extract samples, process steps and parameters from the main text into additional annotation sheets of the isa.assay file (blue, bottom)
The ARC is then committed and pushed to the selected repository. From there, you can add large raw data or analysis results, enrich the metadata, work on it with collaborators and finally publish it with a DOI.
Re-converting entries
Section titled “Re-converting entries”You can update an eLabFTW entry and convert it again into the same ARC:
- Every conversion is stored as a new Git commit. The Version History panel shows what changed (line by line for Markdown and JSON files; for Excel files only that they changed).
- Protocol files and attachments are regenerated from the current eLabFTW entry on each run.
- LLM-generated annotation tables are kept if the LLM step is not run again.
Optional: LLM-assisted annotation
Section titled “Optional: LLM-assisted annotation”When enabled, elab2ARC sends the free-text protocol to a large language model, which extracts samples, process steps and parameters into ISA annotation tables.
| Provider | Where does the protocol text go? |
|---|---|
| LM Studio / Ollama (local) | stays on your computer (the application must be running) |
| Community server / remote API / custom endpoint | is sent to the selected service |
- Before protocol text is sent to a non-local provider, elab2ARC asks for your explicit consent.
- The extraction prompt can be edited via Edit Prompt.
- The quality of the result depends on the model and on how detailed the ELN entry is. elab2ARC only extracts what is written down.
Troubleshooting
Section titled “Troubleshooting”- “LLM extraction failed …”: the message names the reason (e.g. missing key, empty entry content, no parsable model output). The conversion continues without LLM tables.
- Empty or incomplete eLabFTW entries are converted without error; the assay then contains only the available metadata.
- Push fails: check that your DataHUB/GitLab/GitHub token is valid and has write access to the target repository.
Bugs and feature requests: GitHub issues